project C:Home
(→) |
|||
| Line 1: | Line 1: | ||
| − | + | __NOTOC__ | |
| − | + | ||
| − | + | ||
| + | <div style="float: left; width: 1200px; margin-right:20px; text-align:left"> | ||
| − | + | [[File:header2.jpg|1200px]] | |
| − | + | ||
| − | + | ||
| − | |||
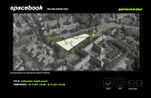
| + | '''Spacebook''' aims to extend the notion of an online social community by providing a user-customizable space that will enhance that community through joining and participating in activities outside the virtual world. Thus '''Spacebook''' brings together the virtual and the physical space: a phenomenon through which everybody can see the activities on the site, the users can join activities that are or will be taking place, create their new activities and (physically) link them with other activities. A new activity hive is born. | ||
| − | < | + | <br> |
| − | + | ||
| − | =<span style="color:orange"> | + | <div style="float:left; width: 280px; margin-right:20px; text-align:justify"> |
| + | =<span style="color:orange">INTERFACE</span>= | ||
| − | + | [[File:flow.gif|280px|left|casual-user interface]] | |
| − | [[File: | + | |
<br> | <br> | ||
| − | The | + | |
| + | The interface design has three steps of functionality which relates to three user-types: the casual user, the advanced user and the administrator. Through this design decision Spacebook provides for the needs of different characters. | ||
[[project C:Home#USER_INTERFACE_2|read more >>]] | [[project C:Home#USER_INTERFACE_2|read more >>]] | ||
</div> | </div> | ||
| − | <div style="float:left; width: | + | |
| + | <div style="float:left; width: 280px; margin-right:20px; text-align:justify"> | ||
=<span style="color:orange">STRUCTURE</span>= | =<span style="color:orange">STRUCTURE</span>= | ||
| − | <youtube width=" | + | <youtube width="280" height="220" right >2WsdfWw3IoE</youtube> |
| − | + | The architectural implementation uses a system of inflatables which have the advantage of being lightweight ultimately reducing the dead-loads while at the same time providing adequate stiffness and flexibility. | |
[[Project C:Home#STRUCTURE_2|read more >>]] | [[Project C:Home#STRUCTURE_2|read more >>]] | ||
</div> | </div> | ||
| − | |||
| − | =<span style="color:orange"> | + | <div style="float:left; width: 280px; margin-right:20px; text-align:justify"> |
| + | =<span style="color:orange">ARCHITECTURE</span>= | ||
| − | [[File: | + | [[File:Sketch03.jpg|280px|left]] |
| + | The user, the interface and the structure are connected by means of the architecture, the complete system. This is the link that unites all the parts involved. | ||
| − | + | [[project C:Home#ARCHITECTURE|read more >>]] | |
| − | |||
</div> | </div> | ||
| + | |||
| + | <div style="float:left; width: 280px; margin-right:20px; text-align:justify"> | ||
| + | |||
| + | =<span style="color:orange">PLAN</span>= | ||
| + | |||
| + | [[File:Blank.jpg|280px|left]] | ||
| + | |||
| + | A realization plan has been drafted. It will provide the support for the project materialization and links with other projects and developments on site. | ||
| + | |||
| + | [[project C:Home#REALIZATION PLAN_2|read more >>]] | ||
</div> | </div> | ||
| − | + | ||
| − | < | + | </div> |
| − | + | ||
| − | + | ||
| + | |||
| + | |||
| + | |||
| + | |||
| + | |||
<div style="float: left; width: 1200px; margin-right:40px; text-align:justify"> | <div style="float: left; width: 1200px; margin-right:40px; text-align:justify"> | ||
| − | =<span style="color:orange"> | + | =<span style="color:orange">INTERFACE</span>= |
<div style="float: left; width: 380px; margin-right:20px; text-align:justify"> | <div style="float: left; width: 380px; margin-right:20px; text-align:justify"> | ||
| Line 70: | Line 83: | ||
[[File:Interface_conclusions.jpg|200px]] | [[File:Interface_conclusions.jpg|200px]] | ||
| − | The research done between several computer programs showed the different possibilities and chances the interface gives to the user and program. It clearly showed that an an easy and understandable interface is linked to limited possibilities in the program. When the computer program offers full control of the content, the interface usually requires a lot of experience of the user. | + | The research done between several computer programs showed the different possibilities and chances the interface gives to the user and program. It clearly |
| + | |||
| + | showed that an an easy and understandable interface is linked to limited possibilities in the program. When the computer program offers full control of the | ||
| + | |||
| + | content, the interface usually requires a lot of experience of the user. | ||
| + | |||
| + | Every interface had some parts that seemed very valuable to the concept of Spacebook: rotation (0-360) in 1 plane by the use of a button, zooming in and out | ||
| − | + | by use of the scroll wheel, given pre-defined possibilities, opportunity to personalize given possibilities and a simple layout. | |
These parts will be integrated with the Spacebook interface | These parts will be integrated with the Spacebook interface | ||
| Line 96: | Line 115: | ||
===Design Proposal=== | ===Design Proposal=== | ||
| − | Research into different interfaces led to the main criteria of Spacebook interface: able to zoom in on the 3D of the location by using the scroll wheel AND a | + | Research into different interfaces led to the main criteria of Spacebook interface: able to zoom in on the 3D of the location by using the scroll wheel AND a |
| + | zoom button; able to rotate around the 3D of the location by using the given buttons; only a limited amount of possibilities are possible; BUT the user has | ||
| − | The user of Spacebook can be anybody: students or business men, but also people less experienced with computers, such as housewives or elderly people. Therefor there will only be an online interface, and it will be a simple one: a clear overview of what is happening on the site, and a direct relation between the input of the user and the (on the website) visible output. Research into interfaces showed that having a simple interface means less personalization of the result. It also means that '''anybody is able to use Spacebook'''. | + | the opportunity to personalize the possibilities; the easy layout make the interface easy to understand for anybody. |
| + | |||
| + | |||
| + | The user of Spacebook can be anybody: students or business men, but also people less experienced with computers, such as housewives or elderly people. | ||
| + | |||
| + | Therefor there will only be an online interface, and it will be a simple one: a clear overview of what is happening on the site, and a direct relation | ||
| + | |||
| + | between the input of the user and the (on the website) visible output. Research into interfaces showed that having a simple interface means less | ||
| + | |||
| + | personalization of the result. It also means that '''anybody is able to use Spacebook'''. | ||
Three interface types of Spacebook are created: the standard user interface, the advanced user interface and the administrator interface. | Three interface types of Spacebook are created: the standard user interface, the advanced user interface and the administrator interface. | ||
| Line 112: | Line 141: | ||
'''To book a space via the <span style="color:orange">standard Spacebook interface</span> is done with only a few easy steps:''' | '''To book a space via the <span style="color:orange">standard Spacebook interface</span> is done with only a few easy steps:''' | ||
| − | '''<span style="color:orange">1)</span>''' After the user selected his preferred day and time an updated 3D layout of the location appears on the right side of the screen.<br> | + | '''<span style="color:orange">1)</span>''' After the user selected his preferred day and time an updated 3D layout of the location appears on the right side |
| − | '''<span style="color:orange">2)</span>''' The user fills out only two criteria: the activity type and the amount of people participating. Then on the left side of the screen the standard solution appears.<br> | + | |
| − | '''<span style="color:orange">3a)</span>''' Three options to personalize the space are given: completely flat (open), a flat roof, or a dome structure. The output is always directly visualized on the left side of the screen.<br> | + | of the screen.<br> |
| − | '''<span style="color:orange">3b)</span>''' Working in library mode gives the user the possibility to select space setups made and saved by other users. This principle works via a popularity poll (most popular spaces at the top).<br> | + | '''<span style="color:orange">2)</span>''' The user fills out only two criteria: the activity type and the amount of people participating. Then on the left |
| + | |||
| + | side of the screen the standard solution appears.<br> | ||
| + | '''<span style="color:orange">3a)</span>''' Three options to personalize the space are given: completely flat (open), a flat roof, or a dome structure. The | ||
| + | |||
| + | output is always directly visualized on the left side of the screen.<br> | ||
| + | '''<span style="color:orange">3b)</span>''' Working in library mode gives the user the possibility to select space setups made and saved by other users. This | ||
| + | |||
| + | principle works via a popularity poll (most popular spaces at the top).<br> | ||
'''<span style="color:orange">4a)</span>''' The user has the possibility to link his activity to another activity by sending a link request. <br> | '''<span style="color:orange">4a)</span>''' The user has the possibility to link his activity to another activity by sending a link request. <br> | ||
'''<span style="color:orange">4b)</span>''' When the user is content with the setup he presses the save button. | '''<span style="color:orange">4b)</span>''' When the user is content with the setup he presses the save button. | ||
| Line 128: | Line 165: | ||
'''The <span style="color:orange">advanced Spacebook interface</span> gives the user more options to create his ideal space and works as follows:''' | '''The <span style="color:orange">advanced Spacebook interface</span> gives the user more options to create his ideal space and works as follows:''' | ||
| − | '''<span style="color:orange">1)</span>''' After the user selected his preferred day and time an updated 3D layout of the location appears on the left side of the screen. <br> | + | '''<span style="color:orange">1)</span>''' After the user selected his preferred day and time an updated 3D layout of the location appears on the left side |
| − | '''<span style="color:orange">2)</span>''' By dragging his mouse over the grid, the user selects the preferred area for his activity. The output automatically updates on the right side of the screen.<br> | + | |
| − | '''<span style="color:orange">3)</span>''' The user has the possibility to personalize his entire space. The standard setting for the curve that defines the space is 'medium', but the user has the possibility to change the curve to 'flat', 'small' or 'large'.<br> | + | of the screen. <br> |
| − | '''<span style="color:orange">4a)</span>''' The user can also select more grid cells, directly next to his already defined space. This also appears on the right sight of the screen. Together with his earlier defined space it starts creating an ensemble.<br> | + | '''<span style="color:orange">2)</span>''' By dragging his mouse over the grid, the user selects the preferred area for his activity. The output |
| + | |||
| + | automatically updates on the right side of the screen.<br> | ||
| + | '''<span style="color:orange">3)</span>''' The user has the possibility to personalize his entire space. The standard setting for the curve that defines the | ||
| + | |||
| + | space is 'medium', but the user has the possibility to change the curve to 'flat', 'small' or 'large'.<br> | ||
| + | '''<span style="color:orange">4a)</span>''' The user can also select more grid cells, directly next to his already defined space. This also appears on the | ||
| + | |||
| + | right sight of the screen. Together with his earlier defined space it starts creating an ensemble.<br> | ||
'''<span style="color:orange">4b)</span>''' The user can then rotate around his created ensemble, and change the curve of each space individually.<br> | '''<span style="color:orange">4b)</span>''' The user can then rotate around his created ensemble, and change the curve of each space individually.<br> | ||
| − | '''<span style="color:orange">5)</span>''' When a user would like to have a space made out of several curves in one row, he uses the 'division' button the determine the beginning and ends of each curve. Each curve can be individually changed to the preffered setting (flat, small, medium or large).<br> | + | '''<span style="color:orange">5)</span>''' When a user would like to have a space made out of several curves in one row, he uses the 'division' button the |
| + | |||
| + | determine the beginning and ends of each curve. Each curve can be individually changed to the preffered setting (flat, small, medium or large).<br> | ||
'''<span style="color:orange">6)</span>''' The created space will be saved when the user is done and added to the library. | '''<span style="color:orange">6)</span>''' The created space will be saved when the user is done and added to the library. | ||
| − | The '''<span style="color:orange">administrator Spacebook interface</span>''' is created for the management of the physical Spacebook site (TU Delft?). The administrator has the right to overrule any activity at any time for maintenance work or other jobs. He can overrule the system by selecting the cells that will be inoperable at a certain time frame. There is also a administrator library where settings for maintenance jobs and spatial criteria are stored. | + | The '''<span style="color:orange">administrator Spacebook interface</span>''' is created for the management of the physical Spacebook site (TU Delft?). The |
| + | |||
| + | administrator has the right to overrule any activity at any time for maintenance work or other jobs. He can overrule the system by selecting the cells that | ||
| + | |||
| + | will be inoperable at a certain time frame. There is also a administrator library where settings for maintenance jobs and spatial criteria are stored. | ||
</div> | </div> | ||
| Line 151: | Line 202: | ||
<youtube width="380" height="145" right >2WsdfWw3IoE</youtube> | <youtube width="380" height="145" right >2WsdfWw3IoE</youtube> | ||
| − | In order to make a fully adaptable construction, the structure has to be able to curve both up and down in one direction. A system of inflatable units is perfect for this purpose: when the air pressure is increased in the top layer the component will curve downwards, and when the pressure is increased in the bottom layer, the component will curve upwards. | + | In order to make a fully adaptable construction, the structure has to be able to curve both up and down in one direction. A system of inflatable units is |
| + | |||
| + | perfect for this purpose: when the air pressure is increased in the top layer the component will curve downwards, and when the pressure is increased in the | ||
| + | |||
| + | bottom layer, the component will curve upwards. | ||
Also, the combination of light materials and the proposed structure will give the construction enough stiffness while being extremely light. | Also, the combination of light materials and the proposed structure will give the construction enough stiffness while being extremely light. | ||
===Research=== | ===Research=== | ||
| − | Over the duration of the course several structural possibilities have been researched, such as a muscle / pulley system, a cube system, and a system with a surface that is either hanging or supported by columns. The most promising possibility turned out to be inflatables: both strong and light. Two main roads of research were followed, which are explained here. | + | Over the duration of the course several structural possibilities have been researched, such as a muscle / pulley system, a cube system, and a system with a |
| + | |||
| + | surface that is either hanging or supported by columns. The most promising possibility turned out to be inflatables: both strong and light. Two main roads of | ||
| + | |||
| + | research were followed, which are explained here. | ||
'''<span style="color:orange">Linear component</span>''' | '''<span style="color:orange">Linear component</span>''' | ||
| Line 170: | Line 229: | ||
[[Project C:bubble component | read more >>]] | [[Project C:bubble component | read more >>]] | ||
| − | After an extensive research of both possibilities it turned out that the linear component was more potent for this project. The main reasons for choosing the linear component are: | + | After an extensive research of both possibilities it turned out that the linear component was more potent for this project. The main reasons for choosing the |
| + | |||
| + | linear component are: | ||
'''<span style="color:orange">1)</span>''' the component is stiffer, | '''<span style="color:orange">1)</span>''' the component is stiffer, | ||
| Line 215: | Line 276: | ||
[[file:Userscenario.jpg|380px]] | [[file:Userscenario.jpg|380px]] | ||
| − | The system connecting the Spacebook interface and the structure at the site should be easy to understand but with tremendous result and inspiring outcomes. Just like Spacebook itself. | + | The system connecting the Spacebook interface and the structure at the site should be easy to understand but with tremendous result and inspiring outcomes. |
| + | |||
| + | Just like Spacebook itself. | ||
===Research=== | ===Research=== | ||
| Line 221: | Line 284: | ||
[[File:Mod_5_2.jpg|380px]] | [[File:Mod_5_2.jpg|380px]] | ||
| − | After extensive in the architectural composition of the site it was concluded that the structure would curve in only one direction (instead of two) and that the floor would stay static (instead of adaptable as well). It turned out that a double curved structure ánd/ór moving floors are not understandable for the future users. Furthermore a single curved structure and a static floor has a very rich architectural output, while easy to understand | + | After extensive in the architectural composition of the site it was concluded that the structure would curve in only one direction (instead of two) and that |
| + | |||
| + | the floor would stay static (instead of adaptable as well). It turned out that a double curved structure ánd/ór moving floors are not understandable for the | ||
| + | |||
| + | future users. Furthermore a single curved structure and a static floor has a very rich architectural output, while easy to understand | ||
===Validators=== | ===Validators=== | ||
| Line 248: | Line 315: | ||
The architectural implementation of the structure follows a set of rules, they can be found in the pictures below. | The architectural implementation of the structure follows a set of rules, they can be found in the pictures below. | ||
| − | Part of the original '''<span style="color:orange">vegetation</span>''' of the site is maintained. Not only to create a border between the heavy traffic surrounding the site, but also to create a transition zone between the activities and structure and the direct environment. The lower bushes and the high trees are kept to create this transition border. The lower bushes make sure the structure is visible from the outside and the site looks accessible. The high trees give the the border more body and ultimately define the shape of the plan of the structure. | + | Part of the original '''<span style="color:orange">vegetation</span>''' of the site is maintained. Not only to create a border between the heavy traffic |
| + | |||
| + | surrounding the site, but also to create a transition zone between the activities and structure and the direct environment. The lower bushes and the high | ||
| + | |||
| + | trees are kept to create this transition border. The lower bushes make sure the structure is visible from the outside and the site looks accessible. The high | ||
| + | |||
| + | trees give the the border more body and ultimately define the shape of the plan of the structure. | ||
| + | |||
| + | The structure system itself creates '''<span style="color:orange">pathways</span>''' next to spaces, see technical implementation. Even without these | ||
| + | |||
| + | automatically created pathways the site is still accessible. Four entrances/exits are created in the border: two leading to the faculty of architecture, one | ||
| + | |||
| + | leading to the Science Centre and one leading to the Botanical Gardens of TU Delft. Situated between the green border and the structure is a small pathway | ||
| + | |||
| + | that can be followed all around the site. This ensures the site is always accessible in the best way possible. | ||
| + | |||
| + | The '''<span style="color:orange">strips</span>''' of the construction are continued in the green border. This creates an interesting transition zone and the | ||
| + | |||
| + | entire site (structure, vegetation and pathways) work as one organism. To strengthen the idea of one organism the architectonic detailing of the strips (the | ||
| + | |||
| + | structural strips, the footpath and the vegetation) is crucial. This architectonic detailing is for example LED lighting in the upper and under surface of | ||
| − | + | the construction, to give the structure its linear shape, also when it's dark. The used materials in the vegetation, pathways and construction surface are | |
| − | + | chosen to enlarge the feeling of linearity, continuity and one organism. | |
<gallery widths="151" heights="98" perrow="4" > | <gallery widths="151" heights="98" perrow="4" > | ||
| Line 277: | Line 364: | ||
[[File:curves2.jpg|380px|left]] | [[File:curves2.jpg|380px|left]] | ||
| − | The '''<span style="color:orange">path system</span>''' is based on an algorithmic system connecting the user output to the structure input. When a user adds | + | The '''<span style="color:orange">path system</span>''' is based on an algorithmic system connecting the user output to the structure input. When a user adds |
| − | In the case when two activities/spaces would like to link, but there is a pathway in between the two, the following will happen: the two spaces will merge together and become one space. The pathway then moves his way around the newly formed space. This is also demonstrated in the drawing on the left. | + | a new space the algorithm will check if the space is connected to a pathway. When this is not the case the algorithm will then create a new path directly on |
| + | |||
| + | the right side of the space. Other users can then add their own spaces to this created path. | ||
| + | |||
| + | In the case when two activities/spaces would like to link, but there is a pathway in between the two, the following will happen: the two spaces will merge | ||
| + | |||
| + | together and become one space. The pathway then moves his way around the newly formed space. This is also demonstrated in the drawing on the left. | ||
When there are no more activities linked to a pathway, the path will disappear and make place for new spaces. | When there are no more activities linked to a pathway, the path will disappear and make place for new spaces. | ||
| Line 285: | Line 378: | ||
| − | The possible '''<span style="color:orange">curves</span>''' | + | The possible '''<span style="color:orange">curves</span>''' a |
| − | + | ||
| − | + | ||
| − | + | ||
| − | + | ||
Revision as of 14:43, 26 November 2011

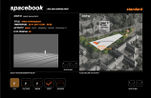
Spacebook aims to extend the notion of an online social community by providing a user-customizable space that will enhance that community through joining and participating in activities outside the virtual world. Thus Spacebook brings together the virtual and the physical space: a phenomenon through which everybody can see the activities on the site, the users can join activities that are or will be taking place, create their new activities and (physically) link them with other activities. A new activity hive is born.
INTERFACE

The interface design has three steps of functionality which relates to three user-types: the casual user, the advanced user and the administrator. Through this design decision Spacebook provides for the needs of different characters.
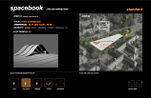
STRUCTURE
The architectural implementation uses a system of inflatables which have the advantage of being lightweight ultimately reducing the dead-loads while at the same time providing adequate stiffness and flexibility.
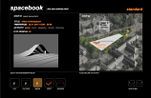
ARCHITECTURE

The user, the interface and the structure are connected by means of the architecture, the complete system. This is the link that unites all the parts involved.
PLAN

A realization plan has been drafted. It will provide the support for the project materialization and links with other projects and developments on site.
INTERFACE
Concept

The interface of Spacebook will be the medium used by the social community to meet new people and organise activities in the real world.
The interface will be a tool that can be used by all people (it is not too hard to understand) but also gives a lot of freedom.
Research

The research done between several computer programs showed the different possibilities and chances the interface gives to the user and program. It clearly
showed that an an easy and understandable interface is linked to limited possibilities in the program. When the computer program offers full control of the
content, the interface usually requires a lot of experience of the user.
Every interface had some parts that seemed very valuable to the concept of Spacebook: rotation (0-360) in 1 plane by the use of a button, zooming in and out
by use of the scroll wheel, given pre-defined possibilities, opportunity to personalize given possibilities and a simple layout. These parts will be integrated with the Spacebook interface
Validators
References
Atom XX / Project XX
Design Proposal
Research into different interfaces led to the main criteria of Spacebook interface: able to zoom in on the 3D of the location by using the scroll wheel AND a
zoom button; able to rotate around the 3D of the location by using the given buttons; only a limited amount of possibilities are possible; BUT the user has
the opportunity to personalize the possibilities; the easy layout make the interface easy to understand for anybody.
The user of Spacebook can be anybody: students or business men, but also people less experienced with computers, such as housewives or elderly people.
Therefor there will only be an online interface, and it will be a simple one: a clear overview of what is happening on the site, and a direct relation
between the input of the user and the (on the website) visible output. Research into interfaces showed that having a simple interface means less
personalization of the result. It also means that anybody is able to use Spacebook.
Three interface types of Spacebook are created: the standard user interface, the advanced user interface and the administrator interface.
Standard interface
Standard interface
Standard interface
Standard interface;user library


To book a space via the standard Spacebook interface is done with only a few easy steps:
1) After the user selected his preferred day and time an updated 3D layout of the location appears on the right side
of the screen.
2) The user fills out only two criteria: the activity type and the amount of people participating. Then on the left
side of the screen the standard solution appears.
3a) Three options to personalize the space are given: completely flat (open), a flat roof, or a dome structure. The
output is always directly visualized on the left side of the screen.
3b) Working in library mode gives the user the possibility to select space setups made and saved by other users. This
principle works via a popularity poll (most popular spaces at the top).
4a) The user has the possibility to link his activity to another activity by sending a link request.
4b) When the user is content with the setup he presses the save button.

Advanced interface

Advanced interface
Administrator interface

Administrator interface


The advanced Spacebook interface gives the user more options to create his ideal space and works as follows:
1) After the user selected his preferred day and time an updated 3D layout of the location appears on the left side
of the screen.
2) By dragging his mouse over the grid, the user selects the preferred area for his activity. The output
automatically updates on the right side of the screen.
3) The user has the possibility to personalize his entire space. The standard setting for the curve that defines the
space is 'medium', but the user has the possibility to change the curve to 'flat', 'small' or 'large'.
4a) The user can also select more grid cells, directly next to his already defined space. This also appears on the
right sight of the screen. Together with his earlier defined space it starts creating an ensemble.
4b) The user can then rotate around his created ensemble, and change the curve of each space individually.
5) When a user would like to have a space made out of several curves in one row, he uses the 'division' button the
determine the beginning and ends of each curve. Each curve can be individually changed to the preffered setting (flat, small, medium or large).
6) The created space will be saved when the user is done and added to the library.
The administrator Spacebook interface is created for the management of the physical Spacebook site (TU Delft?). The
administrator has the right to overrule any activity at any time for maintenance work or other jobs. He can overrule the system by selecting the cells that
will be inoperable at a certain time frame. There is also a administrator library where settings for maintenance jobs and spatial criteria are stored.
STRUCTURE
Concept
In order to make a fully adaptable construction, the structure has to be able to curve both up and down in one direction. A system of inflatable units is
perfect for this purpose: when the air pressure is increased in the top layer the component will curve downwards, and when the pressure is increased in the
bottom layer, the component will curve upwards. Also, the combination of light materials and the proposed structure will give the construction enough stiffness while being extremely light.
Research
Over the duration of the course several structural possibilities have been researched, such as a muscle / pulley system, a cube system, and a system with a
surface that is either hanging or supported by columns. The most promising possibility turned out to be inflatables: both strong and light. Two main roads of
research were followed, which are explained here.
Linear component

Bubble component

After an extensive research of both possibilities it turned out that the linear component was more potent for this project. The main reasons for choosing the
linear component are:
1) the component is stiffer, 2) there is a better knowledge of how to control this system, 3) better architectural and structural proportions, 4) the same spatial results are possible, 5) use of less material.
Validators
References
Atom XX / Project XX
Design Proposal
Balloon connection System

LINK
Concept

The system connecting the Spacebook interface and the structure at the site should be easy to understand but with tremendous result and inspiring outcomes.
Just like Spacebook itself.
Research

After extensive in the architectural composition of the site it was concluded that the structure would curve in only one direction (instead of two) and that
the floor would stay static (instead of adaptable as well). It turned out that a double curved structure ánd/ór moving floors are not understandable for the
future users. Furthermore a single curved structure and a static floor has a very rich architectural output, while easy to understand
Validators
References
park
Atom XX / Project XX
Design Proposal
Architectural proposal

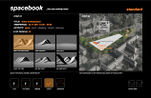
The architectural implementation of the structure follows a set of rules, they can be found in the pictures below.
Part of the original vegetation of the site is maintained. Not only to create a border between the heavy traffic
surrounding the site, but also to create a transition zone between the activities and structure and the direct environment. The lower bushes and the high
trees are kept to create this transition border. The lower bushes make sure the structure is visible from the outside and the site looks accessible. The high
trees give the the border more body and ultimately define the shape of the plan of the structure.
The structure system itself creates pathways next to spaces, see technical implementation. Even without these
automatically created pathways the site is still accessible. Four entrances/exits are created in the border: two leading to the faculty of architecture, one
leading to the Science Centre and one leading to the Botanical Gardens of TU Delft. Situated between the green border and the structure is a small pathway
that can be followed all around the site. This ensures the site is always accessible in the best way possible.
The strips of the construction are continued in the green border. This creates an interesting transition zone and the
entire site (structure, vegetation and pathways) work as one organism. To strengthen the idea of one organism the architectonic detailing of the strips (the
structural strips, the footpath and the vegetation) is crucial. This architectonic detailing is for example LED lighting in the upper and under surface of
the construction, to give the structure its linear shape, also when it's dark. The used materials in the vegetation, pathways and construction surface are
chosen to enlarge the feeling of linearity, continuity and one organism.


Technical implementation


The path system is based on an algorithmic system connecting the user output to the structure input. When a user adds
a new space the algorithm will check if the space is connected to a pathway. When this is not the case the algorithm will then create a new path directly on
the right side of the space. Other users can then add their own spaces to this created path.
In the case when two activities/spaces would like to link, but there is a pathway in between the two, the following will happen: the two spaces will merge
together and become one space. The pathway then moves his way around the newly formed space. This is also demonstrated in the drawing on the left.
When there are no more activities linked to a pathway, the path will disappear and make place for new spaces.