project F:Realisation-c
| (6 intermediate revisions by 2 users not shown) | |||
| Line 7: | Line 7: | ||
<div style="float:right; width: 340px;" > | <div style="float:right; width: 340px;" > | ||
| − | The | + | The overall design construction is based on the wooden ribs of the structure, stabilized by wooden cross beams to which the cushions will be connected. The frames are fixed on two concrete bases to allow it to 'float' just above the park. |
| + | As it's a standard frame mass customized, a Grasshopper plugin to Rhino can automatically generate these frames from the powerlines in the model. | ||
| − | |||
| − | |||
| − | |||
| − | |||
</div> | </div> | ||
[[File:Dstruct.jpg|365px]] [[File:Lasercutt.jpg|350px]] | [[File:Dstruct.jpg|365px]] [[File:Lasercutt.jpg|350px]] | ||
| + | 3D frame setup and alignment, lasercut drawing for model of all the frames | ||
<br> <br> | <br> <br> | ||
<gallery widths="310" heights="210" perrow="3"> | <gallery widths="310" heights="210" perrow="3"> | ||
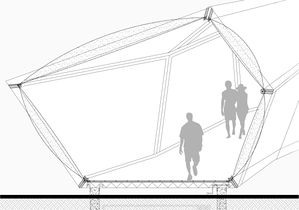
| − | File:P7 section mod.jpg | | + | File:P7 section mod.jpg | Section |
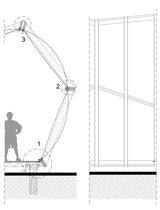
| − | File:P7 technical implementation 1mod.jpg| | + | File:P7 technical implementation 1mod.jpg|Partial section / Elevation |
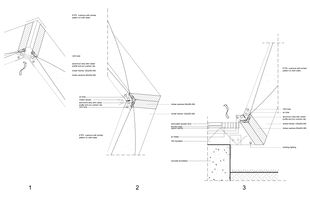
| − | File:P7 technical implementation 2.jpg| | + | File:P7 technical implementation 2.jpg|Details |
</gallery> | </gallery> | ||
<gallery widths="310" heights="210" perrow="3"> | <gallery widths="310" heights="210" perrow="3"> | ||
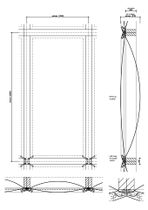
| − | File:P7 Cushion detail.jpg| | + | File:P7 Cushion detail.jpg|cushion setup |
| − | File:Cushion pump setup mod.jpg| | + | File:Cushion pump setup mod.jpg|Air flow system schematics |
| − | File:P7 Sensors scheme.jpg| | + | File:P7 Sensors scheme.jpg|Sensory system for cushion activation |
</gallery> | </gallery> | ||
=<span style="color:gray">Timeline</span>= | =<span style="color:gray">Timeline</span>= | ||
| + | <div style="float:right; width: 340px;" > | ||
| + | <br> | ||
| + | The planning is set in four stages which partially merge at the beginning and end. This way we can always keep going. | ||
| + | |||
| + | In this third stage, we don't have to re-invent the wheel. It is an existing technology that we wish to implement in a new way. | ||
| + | The whole design needs to finalized in order to focus in on the extend of the 1:1 prototype. | ||
| + | After having contacted Buitink Technologies already in phase 2, it could be a good option to contact Rink de Vries, who is their specialist on cushion technologies. | ||
| + | |||
| + | Then we need to be the research and development team to draw up the prototype, develop the pattern, write the Arduino code, calculate the required materials and build it. | ||
| + | |||
| + | |||
| + | |||
| + | </div> | ||
| + | |||
| + | |||
| + | [[Image:P7 construction planning.jpg|700px| ]] | ||
=<span style="color:gray">Materials and Equipment list</span>= | =<span style="color:gray">Materials and Equipment list</span>= | ||
| + | |||
| + | [[Image:111205 Material table mod.jpg |700px| ]] | ||
Latest revision as of 21:02, 5 December 2011
Design Realisation Relationships
Design Execution Prototype Validation Arduino development 1:1 Prototype
Technical implementation
The overall design construction is based on the wooden ribs of the structure, stabilized by wooden cross beams to which the cushions will be connected. The frames are fixed on two concrete bases to allow it to 'float' just above the park. As it's a standard frame mass customized, a Grasshopper plugin to Rhino can automatically generate these frames from the powerlines in the model.

 3D frame setup and alignment, lasercut drawing for model of all the frames
Section
Partial section / Elevation
Details


cushion setup
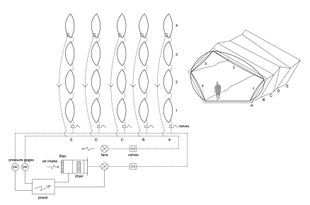
Air flow system schematics
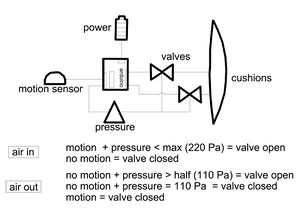
Sensory system for cushion activation


Timeline
The planning is set in four stages which partially merge at the beginning and end. This way we can always keep going.
In this third stage, we don't have to re-invent the wheel. It is an existing technology that we wish to implement in a new way. The whole design needs to finalized in order to focus in on the extend of the 1:1 prototype. After having contacted Buitink Technologies already in phase 2, it could be a good option to contact Rink de Vries, who is their specialist on cushion technologies.
Then we need to be the research and development team to draw up the prototype, develop the pattern, write the Arduino code, calculate the required materials and build it.

Materials and Equipment list
